Design, styles & image editing for Hexus tours
You can customize Hexus tours per your brand colors and styles. You can also crop, annotate, blur out sensitive info all in our editor. Learn more about our editing features in the tour below.Editing captions in your Hexus tour
Automatically generate captions and titles for your tours with our AI feature, or learn how to edit captions in the tour below.Add Interactive Text Input to flows
Enable viewers to type responses directly within your flow. This feature allows you to add interactive text input fields that capture user input and guide them to the next step based on their response perfect for forms, feedback, onboarding, or personalized experiences.Recording voice, camera and AI Avatar & voiceover options
Learn about our various AI generated or manual voiceover and camera recording features below. We also support adding background music in the Player Settings tab. To add pauses in your text-to-speech, you can add this syntax:<break time="1.5s" />
Recording Background Audio or Video for a Tour
Available on Enterprise Plan
- Open your tour in the Product Demo Video template.
- Navigate to the Media Toolbar.
- Click on the Audio or Video tab depending on your desired recording type.
- You can record one continuous video or audio clip that plays seamlessly across the full tour.
- This eliminates the need to record separate clips for each step.
- Ideal for product walkthroughs, voiceover demos, or end-to-end guided tours.
Note: This feature is exclusive to Enterprise plan users. If you’re interested in upgrading, please contact your Hexus account manager.
Adding a Step to Flow
In the tour builder, you can add a step at any point in your flow by clicking theAdd Step button. This allows you to enrich your tour with various types of content or interactivity, such as images, videos, forms, and more.
Each step type helps improve user engagement and guides your viewers through a more compelling and interactive experience.
Replacing a Step in a Flow
In the Hexus tour builder, you can replace a step at any point in your flow by following these steps:- Click on the step that you want to change.
- Click on the gear icon.
- In the menu that appears, you will see three options:
- Duplicate step
- Replace step
- Delete step
- Click Replace step.
- On the main scene, you will be presented with six options to replace the step:
- Upload media – Upload JPG, PNG, GIF, MP4, MOV, or WEBM files (Max 10MB each).
- Add an AI avatar – Add an AI-generated avatar to your step.
- Copy step from other Hexus flows – Use a step from a different flow.
- Record video – Record your screen or camera directly.
- Replace with chrome extension – Use the Hexus Chrome extension to capture content.
- Add image from Unsplash – Search and add a stock image from Unsplash.
Adding / Updating a Title Slide
You can add or update a title slide in your flow by following these steps:- Go to your desired flow.
- Click on Add step.
- In the window that appears, click on Add Title Slide or Form.
- Click on Create a page with a title, call-to-action, or external forms.
- Enter your title and description.
- Click on Add custom CTA to add a call-to-action.
- Click on the Save button.
Auto-add Intro & Outro Steps to all Hexus Flows
To automatically add intro and outro steps to Hexus recorded flows, simply follow these steps:- Click on your profile icon in the left navigation bar
- Select Profile Settings from the dropdown menu
- Navigate to the Customization tab at the top of the settings page
- Toggle on the Intro Step and Outro Step options to enable adding intro and outro steps respectively
- Save your profile settings
Creating Intro & Outro Templates
Availalabe on Enterprise plan and Growth plan as add-on (Contact us)
- Click on Intro/Outro on the right side panel on Hexus flow edit page.
- Click on the Create New button.
- In the template modal, you can update the background (color, gradient, image, or video), blur, adjust alignment, and add a heading, description, and CTA.
- Click on the Save button.
- The created template can be added as an Intro or Outro step to the Hexus flow.
- You can edit the Intro and Outro templates any time.
Combining Steps in the How-to Guide
You can combine multiple steps into one in the how-to guide template to avoid having too many needless steps in the guide.Adding Animated Text
To add animated text for a limited duration on your Hexus flows you can use our Animated Text feature under Annotations settings.- Navigate to the Edit tab for the Hexus flow you want to edit and select the Annotations tab from the toolbar on the right side of your screen
- Click on Add Animated Text from the annotations menu
- You’ll see placeholder text appear (typically “Hello World”)
- Click directly on this text to edit and type in your message
- Use the annotations panel to adjust **font size, color, alignment **&**duration ** for the animated text.
- Finally, position the animated text in the appropriate position on the step
- Preview your changes before publishing
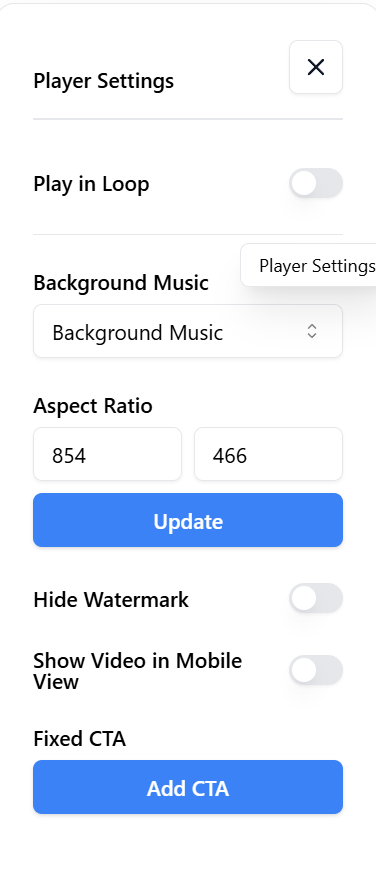
Player and Step settings
Additionally, we support customizing the player under Player Settings in the toolbar for accessibility, responsiveness, brand customization and more:- Closed Captions: This is available on the Growth & Enterprise plan. You can generate a transcript if your flow has audio.
- Play in loop: By default, the interactive tour or video will not play in a loop. To enable autoplaying in a loop, turn the toggle on in the step settings toolbar.
- Background Music: You can select one of our preset background music options. Enterprise plans support adding your own background music.
- Aspect ratio: You can update the aspect ratio for your flows by adjusting the width and height, and clicking Update.
- Watermark: Hiding watermark is only available on our paid plans. Enterprise plan holders can add your own watermark.
- Step settings: You can control the duration of the step or playback speed under Step settings.
- Product Demo Video Animation: You can customize how your product video animates in the Step Settings by changing the animation type.
- Mobile settings: You can toggle the ‘Show in Mobile’ option on in Player settings for your flows so your customers can view your tours on mobiles seamlessly as well. The flow will render as a video instead of an interactive tour.
- Fixed CTA: With this option, you can add a CTA on every step of the demo at a fixed location. You can use this to drive conversions for example “book a demo” or “sign up” or “view help center”.
Zoom In and Out
Adding Zoom helps highlight elements in the spotlight clearly, ensuring a smooth, clean, and aesthetic product tour for your customers. Here’s how you can do it:- Open your desired product tour and click Edit to begin making changes.
- On the right-hand side, click Step Settings.
- In the settings window, switch the toggle to On to enable Zoom.
- Use the Zoom In button to focus on this slide, or the Zoom Out button to return to the default view.
- Click Save to complete the process.
- (Optional) Click Auto Zoom to automatically apply Zoom to all steps in your product tour. Here’s an interactive demo👇
Focus Windows
Focus windows are helpful when you want the users to focus on just one part of the screen. No distractions from any other part of the video, it conveys the message with utmost clarity. Here’s how you can add them:- Go to your desired product tour, click on the ‘Edit’ button to begin making changes.
- On the right hand side, you will find ‘Step Settings’. Click on it to proceed.
- Once the window opens, switch the toggle to ‘on’ to enable the Focus Window
- You can now place the focus window anywhere on the screen
- Complete this by clicking on the save button Here’s an interactive demo 👇